Way2Blogging’s Social Subscription Widget for Blogger / Blogspot
Way2Blogging’s Social Subscription Widget for Blogger. This is another Social Subscription widget for Blogger. If you are my Old reader then you observed in my Old Blogger Template. Today i am giving the Code and How to add the Social Subscription Widget to your Blog.
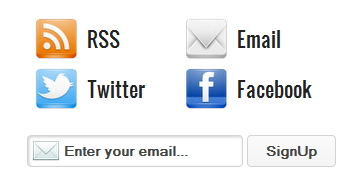
Preview
How to Install Way2Blogging’s Social Subscription Widget ?
There are two simple steps to install this widget! Adding CSS code and Widget code!
Adding the CSS!
- Login to Blogger Dashboard > Choose your Blog and Click the More Options Dropdown
- Select the Template > Click on Edit HTML > Proceed
- Search for
]]></b:skin>and place the below code before it!@import url("http://fonts.googleapis.com/css?family=Oswald&text=AaBbCcEeFfIiKkLlMmOoRrSsTtWw%20"); .w2bOldSocial ul { font-family: 'Oswald', sans-serif; margin: 15px 0; overflow: hidden; } .w2bOldSocial ul li { float: left; width: 90px; padding: 0 0 0 55px !important; margin: 0 0 0 5px !important; line-height: 48px !important; } .w2bOldSocial ul li a { font-size: 20px !important; text-decoration:none; padding:0 !important; margin:0 !important; text-decoration:none; } .w2bOldSocial ul li a:hover { text-decoration:underline; } .w2bOldSocial ul li.w2brss { background: url("http://2.bp.blogspot.com/-HzL4OJ6FzmE/TeTFVVR1A4I/AAAAAAAAA4g/Eiju-1UObXU/s48/RSS.png") no-repeat scroll left center transparent !important; } .w2bOldSocial ul li.w2bmail { background: url("http://2.bp.blogspot.com/-YcW06xYPTM4/TeTFU1cvqbI/AAAAAAAAA4c/1fyAl6q9QRw/s48/Mail.png") no-repeat scroll left center transparent !important; } .w2bOldSocial ul li.w2btwitter { background: url("http://3.bp.blogspot.com/-d8fPV2jD2p0/TeTFVkAMFOI/AAAAAAAAA4k/0jYlyJGVmXM/s48/Twitter2.png") no-repeat scroll left center transparent !important; } .w2bOldSocial ul li.w2bfacebook { background: url("http://1.bp.blogspot.com/-SfiMNXFU9TE/TeTFUbgc_SI/AAAAAAAAA4Y/THAqJLoo_vg/s48/Facebook.png") no-repeat scroll left center transparent !important; } #w2bEmailsub { display: block; clear: both; margin: 10px 0; } form.w2bEmailform { margin: 20px 0 0; display: block; clear: both; } .emailText { background: url("http://3.bp.blogspot.com/-SoB4RN7Bchk/TZ1ouay9q0I/AAAAAAAAAlE/dkyZEzF2HIw/s28/w2b-mail.png") no-repeat scroll 4px center transparent; padding: 7px 15px 7px 35px; color: #444; font-weight: bold; text-decoration: none; border: 1px solid #D3D3D3; -webkit-border-radius: 4px; -moz-border-radius: 4px; border-radius: 4px; -webkit-box-shadow: 1px 1px 2px #CCC inset; -moz-box-shadow: 1px 1px 2px #CCC inset; box-shadow: 1px 1px 2px #CCC inset; } .emailButton { color: #444; font-weight: bold; text-decoration: none; padding: 6px 15px; border: 1px solid #D3D3D3; cursor: pointer; -webkit-border-radius: 4px; -moz-border-radius: 4px; border-radius: 4px; background: #fbfbfb; background: -moz-linear-gradient(top, #fbfbfb 0%, #f4f4f4 100%); background: -webkit-gradient(linear, left top, left bottom, color-stop(0%,#fbfbfb), color-stop(100%,#f4f4f4)); background: -webkit-linear-gradient(top, #fbfbfb 0%,#f4f4f4 100%); background: -o-linear-gradient(top, #fbfbfb 0%,#f4f4f4 100%); background: -ms-linear-gradient(top, #fbfbfb 0%,#f4f4f4 100%); filter: progid:DXImageTransform.Microsoft.gradient( startColorstr='#FBFBFB', endColorstr='#F4F4F4',GradientType=0 ); background: linear-gradient(top, #fbfbfb 0%,#f4f4f4 100%); }
Adding the Widget
- Go to Layout > Click on Add Gadget on your sidebar
- Choose HTML/JavaScript Gadget and Paste the below Widget Code
<div class="w2bOldSocial"> <ul> <li class="w2brss"><a href="http://feeds.feedburner.com/way2blogging">RSS</a></li> <li class="w2bmail"><a href="http://feedburner.google.com/fb/a/mailverify?uri=way2blogging" >Email</a></li> <li class="w2btwitter"><a href="http://twitter.com/way2blogging">Twitter</a></li> <li class="w2bfacebook"><a href="http://facebook.com/way2blogging">Facebook</a></li> </ul> </div> <div id="w2bEmailsub"> <form action="http://feedburner.google.com/fb/a/mailverify" method="post" target="popupwindow" onsubmit="window.open('http://feedburner.google.com/fb/a/mailverify?uri=Way2blogging', 'popupwindow', 'scrollbars=yes,width=550,height=520');return true" class="w2bEmailform"> <input type="hidden" value="Way2blogging" name="uri" /> <input type="hidden" name="loc" value="en_US" /> <input type="text" onblur="if (this.value == "") {this.value = "Enter your email...";}" onfocus="if (this.value == "Enter your email...") {this.value = ""}" value="Enter your email..." name="email" class="emailText" /> <input type="submit" class="emailButton" value="SignUp" title='' /> </form> </div>Customization:-
After adding above Widget code Customize the RSS, twitter and other URLs as follows.!
-
http://feeds.feedburner.com/way2bloggingwith your feedburner url -
http://feedburner.google.com/fb/a/mailverify?uri=way2bloggingchange the Feedburner ID -
http://twitter.com/way2bloggingwith your Twitter URL -
http://facebook.com/way2bloggingwith your Facebook Page URL -
<input type="hidden" value="Way2blogging" name="uri" />change the Feedburner ID with yours.
Bonus Widget!
Here is a Bonus Widget for you. ![]()
Way2Blogging’s Search Box for Blogger.
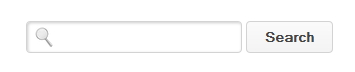
Preview
How to Install the Way2Blogging’s Search Box Widget for Blogger?
Adding the CSS
Add the below css code before ]]></b:skin> tag
#w2bOldSearch {
	display: block;
	clear: both;
	margin: 10px 0;
}

#w2bOldSearch #w2bSinput {
	background: url("http://2.bp.blogspot.com/-Q-Ejkmx-Ki4/Teem3RZlpqI/AAAAAAAAA40/_p6u9Xpgs7c/s20/Search-icon.png") no-repeat scroll 8px center transparent !important;
	padding: 7px 15px 7px 35px !important;
	color: #444;
	font-weight: bold;
	text-decoration: none;
	border: 1px solid #D3D3D3 !important;

	-webkit-border-radius: 4px;
	-moz-border-radius: 4px;
	border-radius: 4px;

	-webkit-box-shadow: 1px 1px 2px #CCC inset;
	-moz-box-shadow: 1px 1px 2px #CCC inset;
	box-shadow: 1px 1px 2px #CCC inset;
}

#w2bOldSearch #w2bSsubmit {
	color: #444;
	font-weight: bold;
	text-decoration: none;
	padding: 6px 15px;
	border: 1px solid #D3D3D3;
	cursor: pointer;

	-webkit-border-radius: 4px;
	-moz-border-radius: 4px;
	border-radius: 4px;

	background: #fbfbfb;
	background: -moz-linear-gradient(top, #fbfbfb 0%, #f4f4f4 100%);
	background: -webkit-gradient(linear, left top, left bottom, color-stop(0%,#fbfbfb), color-stop(100%,#f4f4f4));
	background: -webkit-linear-gradient(top, #fbfbfb 0%,#f4f4f4 100%);
	background: -o-linear-gradient(top, #fbfbfb 0%,#f4f4f4 100%);
	background: -ms-linear-gradient(top, #fbfbfb 0%,#f4f4f4 100%);
	filter: progid:DXImageTransform.Microsoft.gradient( startColorstr='#FBFBFB', endColorstr='#F4F4F4',GradientType=0 );
	background: linear-gradient(top, #fbfbfb 0%,#f4f4f4 100%);
}
Adding the Widget Code
Add the below widget Code in HTML/JavaScript Gadget.
<div id="w2bOldSearch">
	<form action="/search">
		<input type="text" name="q" id="w2bSinput" />
		<input type="submit" value="Search" id="w2bSsubmit"/>
	</form>
</div>
That’s it! If you liked the widgets and this post then please share it.
leave your comments and suggestions. ![]()

Really well designed widget Harish. Simple and effective. Hope to see a lot more of these.
Hi Harish,
By watching this gadget I am remembering your old template,Pls provide us your old template….
very soon..
Amazing work Harish.
You update your blog once in weeks or months maybe, but the tutorials you come with are worth that time. Amazing work bro !!! I visit your blog everyday just to see if your have updated it with some cool new trick or not ???
Keep up the good work
thanks for the kind of words
Very nice tutorial and beautiful widgets
Thankyou , My site – http://www.techwindow.org visit for tech tricks
its not work properly
fixed some issues.
When i add above social widget,There no social icons r displaying PLZ help me…
fixed some issues
thank you
Hello Harish
your idea behind the following widget is cool but i am having a problem while editing my blog’s template. the error it shows is
Error parsing XML, line 1077, column 64: The reference to entity “text” must end with the ‘;’ delimiter.
you should add it before
]]></b:skin>tag. then this problem will not occur.Any way it was Fixed now!
Thanks
awesome widget admin :))
keep sharing >>
wow so cool…
Way2Blogging’s Social Subscription Widget for Blogger / Blogspot
not working correctly in gadget mod when i install it in widget mod there is no pictures just links
Really nice one very simple and cool.
Nice social bookamrk images and a lot of help installing them with your code
Am looking to place them in the footer though
Gather I can adjust the code as need be
Greg
pls how can you do this in wordpress
awesome
http://smgoddess9.blogspot.com/
How to delete search box (black) of this template ^^ thanks very much …
You need to edit the template to remove it!
find for
id='search-form'and remove the entire code.I like ur widgets & share my blog ur Social plugin Widget…..
Awesome … These widgets working parfect … Thanx a lot
Since i m new to blogger’s platform I m having problem adding a Drop Down menu . I tried googling . But the codes generate a drop down that are been displayed over the Heading of first Post . Where can i get the code to add a drop down to the template ???
sorry no widget generator for it!.
This is fantastic – thank you!
I wonder though, is there a way to open on a new tab with click of each widget?
thanks a lot , really a nice widget
http://it-dailynews.blogspot.com/
Thanks Harish, it’s looking very nice on my blog.
harish, you did great job, I am waiting for more widgets
excellent . Thanks 4 sharing . waiting 4 more…..
tks you shareing :d
Hello! Harish Can you Tell Me How To Add a Comment Box Like a WordPress with Options Like a Name,Mail,Website?
blogger has no support for customizing comments form.
I like template…
Good, very good progress from old one.
very nice simple physical template.. like
hi thank you so much,it worked ,but it does not have logos but the actuall writing.how should i add logos instead of writing.
blogger has recently changed their interface ,how about you write something like blogger for dummies.it will really help alot of ppl like me
Thanks a lot it work for me.
The comment section in blogger is really out dated…Is there any hack to place a new comment form which provides support for URLs.I think more people will be prompted to make comments if that was possible.Any suggestions???
No :/
Classic social media book marking stuff. I have used for my personal blogs excellent job. Thanks for sharing such information
Easy to install and worked right off the bat. Very pleasant experience.
However, I’d like to point out that the result wasn’t quite what is shown above, namely the icons on two lines. Not a big deal, but a surprise.
Could you publish an article on how to have what your blog has at the top right, a vertical arrangement of everything fromSubscribe down through and including the Search box.